It is currently April 20th, 2024, 1:03 am

21 Scarab SOB Overhaul - Pic Heavy

View active topics

All times are UTC - 5 hours [ DST ]


Post new topic Reply to topic  [ 47 posts ]  Go to page Previous  1, 2, 3, 4, 5  Next
Author Message
 PostPosted: January 26th, 2015, 6:05 pm   
Team Member
User avatar

Joined: April 3rd, 2012, 5:09 pm
Posts: 1187
Location: Ontari-ari-ario
Awesome! Did you throw some lights and greenery on the hull and trailer for Christmas?

_________________
When you need more power try Binford tools.

Charger 18 DL, 2.6L Yamaha


Top
 Profile Send private message  
 PostPosted: January 27th, 2015, 10:13 pm   
Member

Joined: April 26th, 2013, 10:33 pm
Posts: 120
Location: Calgary, Alberta
Thanks guys, I thought everybody would get a kick out of the garage storage idea. It turns out my neighbours did as well.
Lots of people have driven by and taken pictures, and I'm told that my garage is on a number of other websites although I have not seen where yet.

Just a bit more background and then I'll get into the current project. The wiring and gauges, new steering, new fuel lines, and a few other minor issues were all done late summer 2012. I had been meaning to post these a long time ago but you know how things go. The V8 project was not progressing very quickly so instead I quickly put a V6 together with stuff I had sitting around. Early 90s closed-deck 3.0L 225 carb, box stock aside from disabled oil injection and a Bob's cone. I'd had the rebuilt long block just sitting around, so at least this got me on the water after all summer sweating under the dash.

Attachment:
145 - V6.jpg
145 - V6.jpg [ 193.07 KiB | Viewed 2299 times ]


The boat came with a homemade static setback bracket that was pretty beefy so I just bolted to that with a couple of setback spacers, for a total of 9" I believe.

Launching for the first time - early September 2012. This is at the public launch in Sarnia, actually just a few hundred yards from where they put the turn buoy for the OPA races Jay participated in.

Attachment:
In the water 2.jpg
In the water 2.jpg [ 219.59 KiB | Viewed 2299 times ]


It floated, ha ha. With a 23" Renegade it ran right around 60 mph. Acceleration was poor. Almost zero chine walk even with the stock rubber mounts, but I think the trim tabs were helping that. The tabs pump and wiring were shot so they were just along for the ride although fully "up". Torque steer was pretty bad too (no torque tab). Without the hydraulic it would have been a bitch to steer. I had tonnes of water pressure but was on the top hole on the plate. Anyway, lots of room for improvement in the setup but at least I was on the water. I used it a few times in the summer of 2013 more or less as-is (replaced the stereo - no pics), but then I got totally bogged down in some massive house renos and the boat just sat all through the summer of 2014.

In the next post I'll get into the current project of getting it ready for the V8.


Attachments:
In the water 1.jpg
In the water 1.jpg [ 32.41 KiB | Viewed 2299 times ]

_________________
Current Boats:
1986 21' Wellcraft Scarab I - OMC V8 Resto-Mod Project
1987 21’ Checkmate Starflite - to be 250HO ETEC
Top
 Profile Send private message  
 PostPosted: February 7th, 2015, 5:19 pm   
Member

Joined: April 26th, 2013, 10:33 pm
Posts: 120
Location: Calgary, Alberta
Sorry for the delay in posts, been really busy with real work. Now that I've given all the background, here this winter's project.

I discovered some wet spots in one of the stringers when installing a new fuel filter. I had done some quick "tap" tests of the transom and stringers when I bought the boat, and they seemed fine. The bulkhead at the back of the fuel tank was evidently soft, but I was OK with replacing that eventually. I suspected that the transom had been replaced at some point because the homemade setback had a non-BIA bolt pattern. No way it would have left Wellcraft drilled like that. Anyway, I obviously missed some spots on the stringers. Wet stringers are not exactly uncommon on a nearly 30 year old boat.

Here's a pic of the transom and rear floor. I'm taking the pic through a large hatch that the ski locker drops into (keep in mind these boats were more intended as stern drives so there's a lot of room back here in the O/B version).

Attachment:
Scarab Renos 1 214-Optimized.JPG
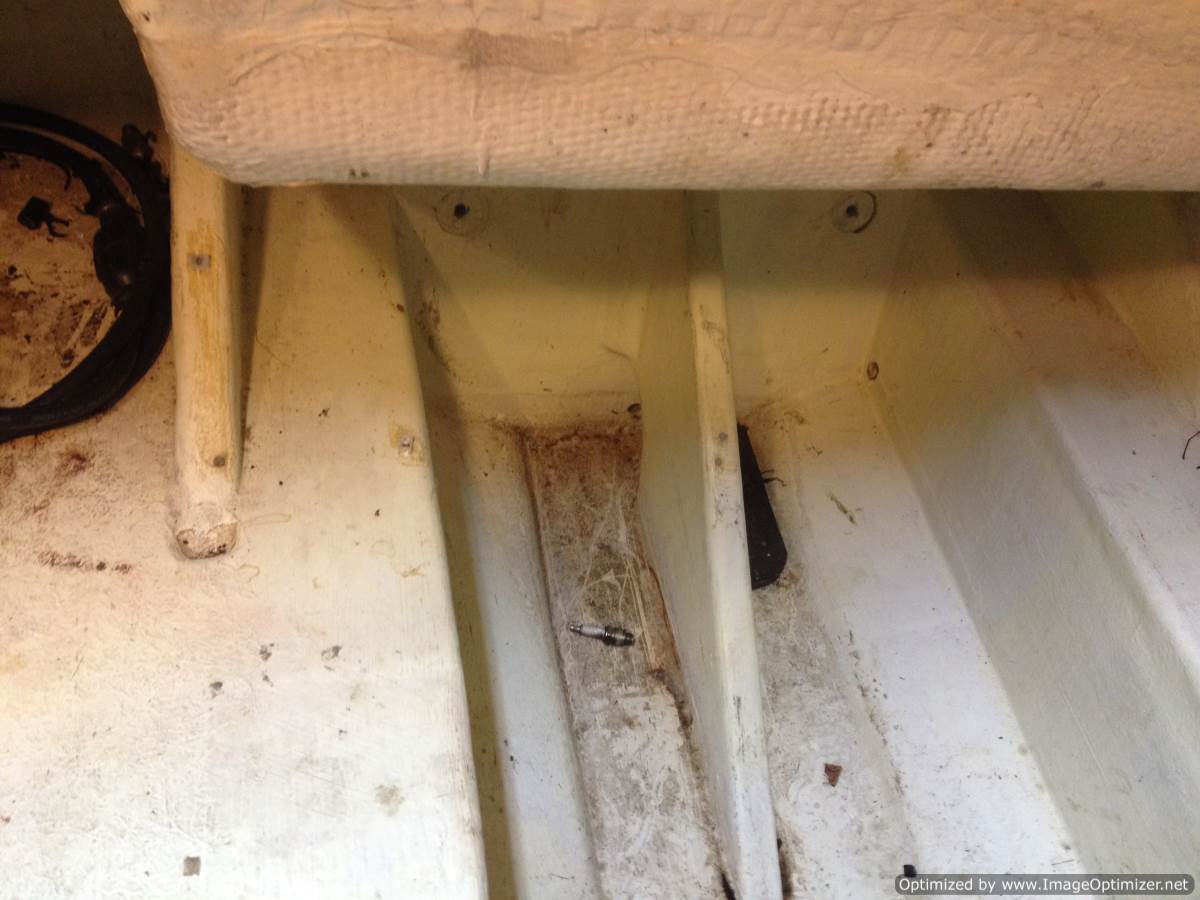
Scarab Renos 1 214-Optimized.JPG [ 89.41 KiB | Viewed 2260 times ]


I unbolting the old static setback (well sealed), and poked around all the mounting holes - wood was dry. To confirm, I cut several "plugs" of glass out of the transom with a hole-saw to be able to probe around some more. You can see the ones I did around the inside of the mounting holes.

Attachment:
Scarab Renos 1 238-Optimized.JPG
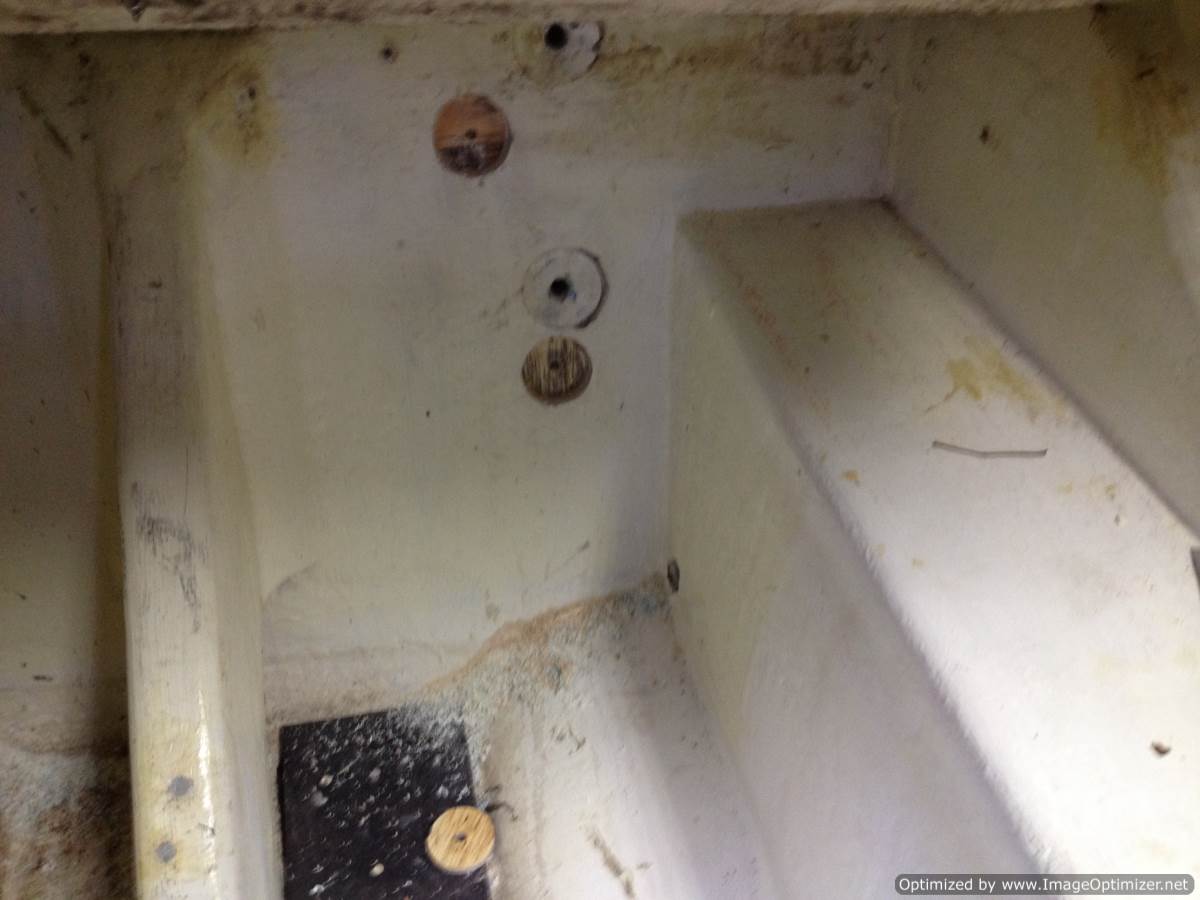
Scarab Renos 1 238-Optimized.JPG [ 68.03 KiB | Viewed 2260 times ]


The wood is bone dry. You can kind of see a dark layer in one of the holes - that's the reddish purple phenol-formaldehyde glue of marine plywood (I chistled some of the top veneers off to check it). At this point I was 95% sure somebody had replaced the transom.

Replacing the aft potions of the stringer would be easy due to the access, but under the cockpit is a different story. This boat has a full cockpit liner that's moulded as part of the deck (i.e. no plywood floor to lift up). Here's the big cockpit gas tank access hatch removed so I can poke around the forward sections of the stringers.

Attachment:
Scarab Renos 1 210-Optimized.JPG
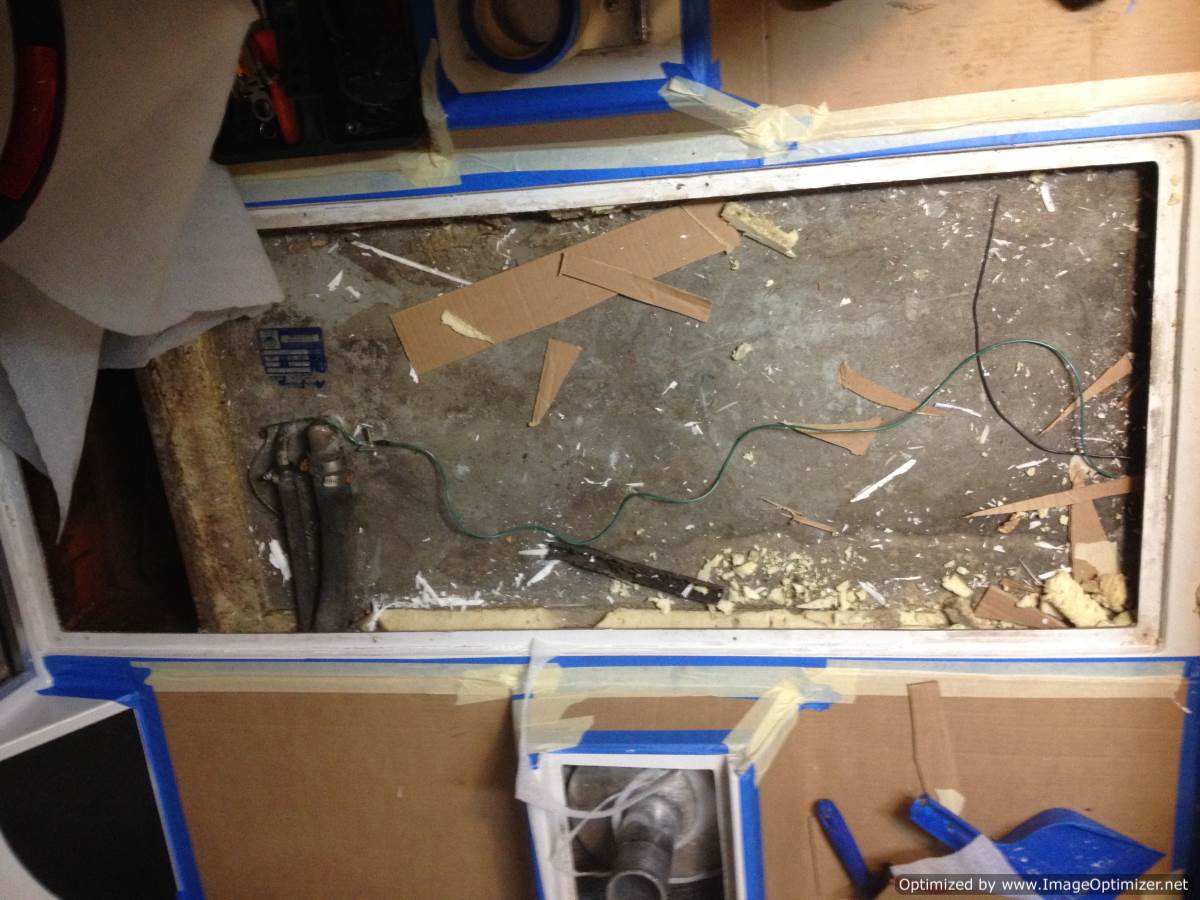
Scarab Renos 1 210-Optimized.JPG [ 121.79 KiB | Viewed 2260 times ]


I couldn't get to much of the stringers due to the height of the tank, bonding putty, and tonnes of foam.

_________________
Current Boats:
1986 21' Wellcraft Scarab I - OMC V8 Resto-Mod Project
1987 21’ Checkmate Starflite - to be 250HO ETEC


Top
 Profile Send private message  
 PostPosted: February 7th, 2015, 5:42 pm   
Member

Joined: April 26th, 2013, 10:33 pm
Posts: 120
Location: Calgary, Alberta
After poking around the rear stringers some more, I decided to hell with it, I'm doing the full pull and replacing all the stringers and bulkheads. Nothing was totally mushy, but I found more wet spots. I'm going to be hanging a V8 off a 12"+ setback with tie-bars to the stringers, they have to be mint.

The cockpit will have to be cut out and reglassed, and the tank needs to come out too. To prepare for the demo work, I started to protect all the floor gel-coat and interior with cardboard, foam sheet, and plastic.

Attachment:
Scarab Renos 1 231-Optimized.JPG
Scarab Renos 1 231-Optimized.JPG [ 73.08 KiB | Viewed 2258 times ]


Removing interior:

Attachment:
Scarab Renos 1 255-Optimized.JPG
Scarab Renos 1 255-Optimized.JPG [ 109.26 KiB | Viewed 2258 times ]


Started to cut the rear floor out (it's a regular plywood floor - only the cockpit is part of the deck mould). I was surprised that the floor was barely bonded to the rear stringers and bulkheads - some rusty nails and a few strips of glass...nice ..... :?

Attachment:
Scarab Renos 1 241-Optimized.JPG
Scarab Renos 1 241-Optimized.JPG [ 77.37 KiB | Viewed 2258 times ]

_________________
Current Boats:
1986 21' Wellcraft Scarab I - OMC V8 Resto-Mod Project
1987 21’ Checkmate Starflite - to be 250HO ETEC


Top
 Profile Send private message  
 PostPosted: February 16th, 2015, 10:14 pm   
Member

Joined: April 26th, 2013, 10:33 pm
Posts: 120
Location: Calgary, Alberta
So I've been busy cutting the floor out. I have a Fein oscillating tool and it has been extremely handy in tight spots. I'm using a Dremel universal carbide tipped blade and it does a really good job on both the glass and plywood.

Attachment:
Scarab Renos 1 244-Optimized.JPG
Scarab Renos 1 244-Optimized.JPG [ 65.36 KiB | Viewed 2233 times ]


For a lot of the cutting I've been using a Rigid one-handed recip saw with another carbide blade. Has also been working pretty good in the glass and plywood.

Attachment:
Scarab Renos 1 259-Optimized.JPG
Scarab Renos 1 259-Optimized.JPG [ 51.68 KiB | Viewed 2233 times ]


Here's the port side with the floor all cut out. You can see how somebody has cut the last foot off the outer stringer and (badly) tabbed in a new one. The same thing was done to the inner stringer (the boat has 4, plus 3 large transom knees which look to also be retrofits). This was confirmation that the transom had been replaced previously. I'm only cutting out the portside stringers and bulkheads to prevent unnecessary bending of the boat - I'll replace one side at a time.

Attachment:
Scarab Renos 1 266-Optimized.JPG
Scarab Renos 1 266-Optimized.JPG [ 52.81 KiB | Viewed 2233 times ]

_________________
Current Boats:
1986 21' Wellcraft Scarab I - OMC V8 Resto-Mod Project
1987 21’ Checkmate Starflite - to be 250HO ETEC


Top
 Profile Send private message  
 PostPosted: March 10th, 2015, 10:17 pm   
Member

Joined: April 26th, 2013, 10:33 pm
Posts: 120
Location: Calgary, Alberta
So I've been super busy on the boat and with work, and as a result have gotten behind on posting pics.

I bought a dust collector and modified it to control the fiberglass dust from sawing and grinding. It's a 1 hp unit from Busy Bee, around 200 bucks. The fan is inside, but I added duct work on the exhaust side to put the dust bag outside. That way, any leaks are outside, plus it means I can use it to exhaust solvent/resin vapours. I cut a hole in my custom "wall door", and the bag nestles under the trailer frame when it inflates. My neighbours thought I was crazy before.....ha ha ;)

Image

Image

Rigid duct runs up the side of the boat to a swivel elbow, and then transitions to 4" flex duct that I can move to wherever I'm cutting or grinding.
Image

I still use a shop vac to suck up a lot of the mess too. I'm mostly trying to get the stuff that flies off the grinder.
Image

The other thing the fan accomplishes is it puts my garage under negative pressure with respect to the rest of my house, which prevents dust and vapours from migrating into the house (attached garage has a door into my front hallway).

More pics to come on cutting out the structure and foam.

_________________
Current Boats:
1986 21' Wellcraft Scarab I - OMC V8 Resto-Mod Project
1987 21’ Checkmate Starflite - to be 250HO ETEC


Top
 Profile Send private message  
 PostPosted: April 5th, 2015, 7:00 pm   
Member

Joined: April 26th, 2013, 10:33 pm
Posts: 120
Location: Calgary, Alberta
Again, been super busy on boat and life and have got behind on pics. Will try to keep up better.

Cutting out the shitty stringers and bulkheads was actually pretty straightforward. The stringers are not full-length (in one piece). The first section stops at the main bulkhead behind the fuel tank, then another piece carries on. The joint was terrible from the factory; there's actually only about 1 layer of matt+ roving that bonded this mess together. The water absorption was mostly from the unsealed limber holes in the bulkheads.

Image

The main bulkhead came out really easy since it was mostly mush:

Image

Image


Cutting rear of main stringer out at transom:

Image

_________________
Current Boats:
1986 21' Wellcraft Scarab I - OMC V8 Resto-Mod Project
1987 21’ Checkmate Starflite - to be 250HO ETEC


Top
 Profile Send private message  
 PostPosted: April 5th, 2015, 7:20 pm   
Member

Joined: April 26th, 2013, 10:33 pm
Posts: 120
Location: Calgary, Alberta
After getting most of the accessible crap cut out in the transom area, I moved on to the cockpit. Keep in mind that unlike similar boats like Challengers/Superboats, etc, this boat does not have a plywood floor. The entire cockpit floor/sides/rear seat/storage locker is part of the deck mould. This is fast-n-dirty for production builders like Wellcraft. It is a PITA to work on though. As previously mentioned, I have to cut out and then re-glass the floor pan back in.

Here's the starting point, protected the surface of the floor previously:

Image


Disconnecting fuel lines: (note the original fuel fill line is cracking - anybody else who has an older boat with non-ethanol resistant fill and vent lines should think about this..... :roll: )

Image

And floor plan cut out. It's a pretty straightforward cut with an angle grinder. I'm doing it in 2 sides - you'd never be able to remove it in one piece due to the shape and angles plus it would be awkward as hell even if you could get it out. The floor is around 1/2" thick, plywood-cored. I chose a cut-lined that would be behind the carpet that on the sides of the cockpit. The yellowish marks are the residual carpet glue. Even though I plan to do a good glass job, most of the joint will actually be hidden by carpet. There will be one visible joint (well invisible if I do a good gel match) along the rear of the cockpit. If I put cockpit carpet back in that will be invisible too.

Image

Here's what it looked like with floor pan lifted out. The bonding putty was poorly adhered (good for me !). I cut the accessible areas over the tank with my recip saw, and then pried all around it with a long bar. The bonding putty just finally "popped". I was never a fan of polyester products as adhesives before and the lack of bond here confirmed that.

Image

_________________
Current Boats:
1986 21' Wellcraft Scarab I - OMC V8 Resto-Mod Project
1987 21’ Checkmate Starflite - to be 250HO ETEC


Top
 Profile Send private message  
 PostPosted: April 5th, 2015, 8:22 pm   
Member

Joined: April 26th, 2013, 10:33 pm
Posts: 120
Location: Calgary, Alberta
Here's some pics of cutting the stringers and bulkheads out from around the fuel tank. Although the boat has a big cockpit hatch, it would actually be impossible to get the tank out of the hatch opening due to a bulkhead in front of it plus the overall length of the tank under the seat base. The tank is in not bad shape, but I'm still leaning towards replacing it simple due to age.

Starting to cut out the stringer around the tank (carefully not to go past the outer skin of the stringer).

Image

Removing the (rotten) bulkhead immediately in front of the fuel tank.

Image

After cutting away the outer layer of glass on the stringer, I pried away the wood core, which is actually pine by the way. Piss-poor, I'll elaborate on that issue in another post. I'm being careful about how this work is going because I do NOT want to cut into the tank ! I did the final cuts through the inner skin of glass (closest to the tank) with the oscillating saw, which is much more controllable than the grinder. I don't know how I ever lived without one of these, I love it !

Image

The stringer is now gone, and I'm cutting the final foam out on the far side of the tank. That Japanese-style handsaw is the best thing for cutting foam. It actually does a decent job of cutting glass/plywood too (induction-hardened teeth).

Image

_________________
Current Boats:
1986 21' Wellcraft Scarab I - OMC V8 Resto-Mod Project
1987 21’ Checkmate Starflite - to be 250HO ETEC


Top
 Profile Send private message  
 PostPosted: April 5th, 2015, 8:39 pm   
Member

Joined: April 26th, 2013, 10:33 pm
Posts: 120
Location: Calgary, Alberta
After cutting the final foam alongside the intact stringer, as well as slicing from the forward an aft ends, the tank just pried out of the foam easily. I'm not a big guy but I just man-handled it out.

Image

Then up onto the deck, then I tossed it out back in a snow bank to be dealt with later.

Image

Here's the remaining foam and mess:

Image

And all cleaned up, ready for grinding. Lots and lots of grinding.... :(

Image

_________________
Current Boats:
1986 21' Wellcraft Scarab I - OMC V8 Resto-Mod Project
1987 21’ Checkmate Starflite - to be 250HO ETEC


Top
 Profile Send private message  
Display posts from previous:  Sort by  
Post new topic Reply to topic  [ 47 posts ]  Go to page Previous  1, 2, 3, 4, 5  Next

All times are UTC - 5 hours [ DST ]


Who is online

Users browsing this forum: No registered users and 2 guests


You cannot post new topics in this forum
You cannot reply to topics in this forum
You cannot edit your posts in this forum
You cannot delete your posts in this forum
You cannot post attachments in this forum

Search for:
Jump to:  
cron


Powered by phpBB © 2000, 2002, 2005, 2007 phpBB Group
Style originally created by Volize © 2003 • Redesigned SkyLine by MartectX © 2008 - 2010